


You’ll find a great article on our main AccurateShooter.com website by GS Arizona about the basics of neck turning. This article is a good read if you are new to neck-turning or just want some tips on how to improve your neck-turning techniques. You can see some of the highlights and photos below, but to see all the illustrations and to follow the steps step-by-step, you will need to read the entire article. Why Should You Consider Neck-Turning?If your rifle does not have a tight chamber, then the answer is “because you must”. Neck turning isn’t necessary for the majority of Highpower shooters. However, it can be an effective way to get your ammunition closer to the pot of gold at end of rainbow: perfection. I’m not referring to a theoretical improvement but rather a real improvement. This improvement is found in optimizing and balancing the neck tension on your loaded rounds. Inconsistent tension at the neck is a major contributor to increased muzzle velocities, which in turn is a major factor in elevation dispersion over long distances. This is the main reason for neck-turning: to optimize and equalize neck tension to reduce elevation dispersion. The Tools of the Trade
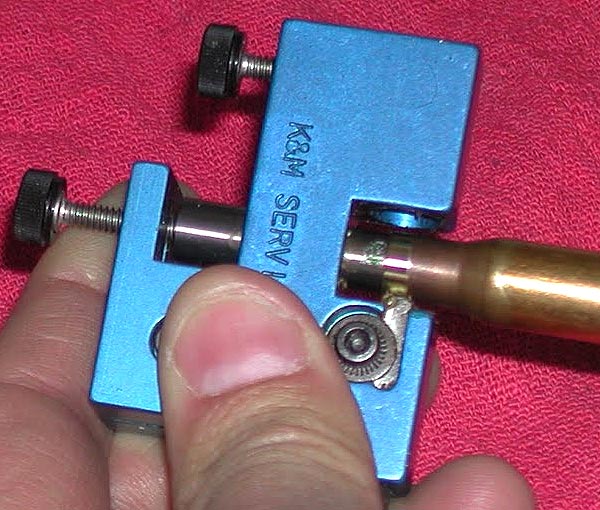
Here’s everything I use, plus a little more. Here’s what I use: the press, a cordless driver (always plugged in because turning is hard on an old battery), two K&M neck-turners (one for 6mm and the other for.30), an expander for every size, Imperial lubricant, an old toothbrush to keep the cutters clean, a handle that has a caseholder for those times when the screwdriver breaks down, but there’s still one case left! The list includes a steel wool, a tubing microscope and a cordless screwdriver. Hey, I forgot to include the dial calipers! Keep them handy. They aren’t useful for measuring neck thickness. I use an Optivisor to see what’s going on with the neck. Expanding the Neck
Apply some lubricant to the inside of the neck of the case and then run it through the expander. This is not difficult. I prefer to expand the case before turning it, rather than expanding all of them and then turning. Brass is springy and will tend back to its original size. By expanding and turning immediately you are more likely get all cases to fit the mandrel at the same tightness, and with a consistent depth of cut. Cutter Adjustment to Cut Depth and Length
All the tools that I’ve seen had pretty good instructions for adjustment. They don’t tell that you need five to ten extra cases to get the initial setup right. While you are learning, you can use anything of the right size. For example, you can use cheap surplus.308 to do the initial setup, and save your precious.30-6 for when you have a better understanding. You’ll have to adjust the cutter for both thickness and length (just into shoulder) so be patient and slow. The depth of cut (brass thickening) can be a little tricky, but the length is usually easy to set. The Finished Product – A Perfectly Uniform Nose
With a little practice, if you read the entire article and use quality tools, you will get great results. Here’s a finished neck-turned brass example to demonstrate. You will see that the neck is perfectly 0.0125′ thick. It’s uniform all around, I usually only see a difference of 1 or 2 ten thousandths. With the necks uniformed, we can now select the bushing size to give us the neck tension that we prefer and experiment with different levels of tension. We are confident that all cases will have the desired tension. German Salazar was a top-tier gun writer and rifleman. His writing handle was “GS Arizona”. German died in 2022 from a medical condition. German was instrumental in getting this website and Forum started. We remember him as an extremely dear and valued friend. German was an amazing individual and a valuable asset to the sport. German, an attorney with a background in engineering, was one of the best gun writers. He also had excellent shooting skills that matched his writing ability.