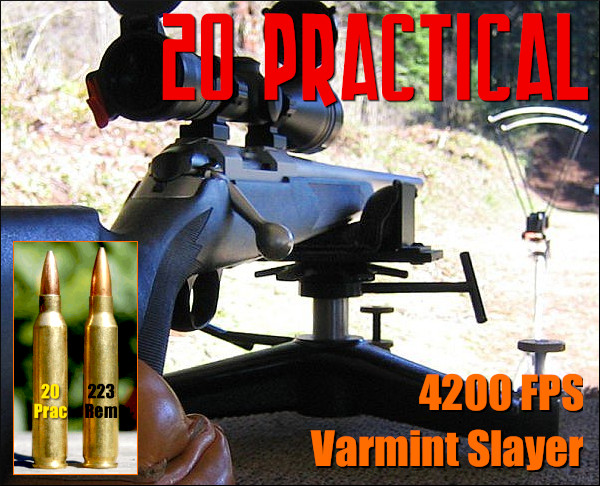


Do you have the.20-Cal bug? Do you want to see how a projectile with a velocity of 4200+ fps can affect an unwary prairie dog? You could buy a 204 Ruger, pay for a complete die set and hope the brass is available. Warren B, aka “Fireball”, has a better solution. If you already have dies and brass for.223 Rem, you only need a new barrel to shoot the 20 Practical and a bushing of.230″ to neck down your cases. Warren’s wildcat can be made simple, fast, and inexpensive. The 20 Practical is a cartridge that performs as well as the 20 Tactical, but with less money and without the need to purchase forming dies or cases. Warren’s cartridge had a great name. It is practical. 20 Practical Tikka Bolt Action Varminting by Warren B. (aka “Fireball”) & Kevin Weaver. After building my 20 PPC I wanted to build another.20 caliber repeater that could be used for predator hunting and also as a prairie dog/gopher rifle. I wanted to use the Tikka M595 sporter that I owned. This rifle is a repeater that feeds extremely smoothly from its single-column mag. I started by looking at different case designs to fit the magazine, since the Tikka came from the factory as a.223 Remington. Brass was scarce at the time, and the 204 Ruger round was very new. I didn’t like the case design, either because it was too long or because the throat dimensions were standard. I then looked at 20 Tactical. It was a good cartridge, but I didn’t care for the $150 price tag on a two-die Tac 20 with a full-length die only and a standard seater. Not only were the costs an issue, but I had become accustomed to a Redding set that included a body die and a Type S bushing neck die as well as a Competition Seater. I was also not a fan of the name 20 Tactical. There is nothing tactical about this cartridge. I didn’t want a new cartridge because of what I thought was a marketing gimmick. Warren B. aka “Fireball” with his Tikka. It cycles perfectly in rapid-fire with its smooth action and phenolic one-column magazine. Just Neck Down the.223 Rem to Create a 20-223 Wildcat
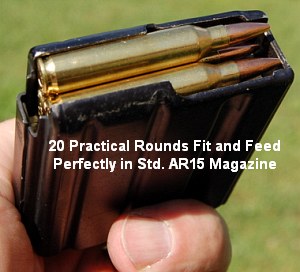
I decided that the best way to make a 20-223 was to neck down the.223 Rem and turn it into a 20-223. I already had dies, brass, and a rifle which would feed it perfectly. I called the cartridge 20 Practical, because it is very practical. You will see that in this article. The 20 Practical case is easy to make, and does not require any fire forming at the end. Brass and dies are readily available and cheap. Just neck down your.223 Remington cases, load them and shoot. [Editor’s note: Over the years other shooters have experimented by necking down.223 Remington case to.20 calibre, some with longer throats, others with different shoulder angles. Warren does not claim to be the pioneer who fitted a.20 caliber bullet into a.223 case. He gives credit to those who pioneered the work years ago. He has developed a 20-223 wildcat which does not require special case-forming and requires minimal investment in dies or tooling. He ordered the original PTG 20 Practical Reamer design and he and Kevin performed the field testing in order to demonstrate the performance. Kevin Weaver from Weaver Rifles fitted and chambered the barrel on my rifle. Kevin is a great person to work with and does excellent work. Kevin was so impressed with the 20 Practical that he decided to buy the project reamer. Kevin didn’t need to buy a Go/NoGo gauge. He used his existing.223 Rem. Kevin and I discussed the reamer specifications before he ordered the reamer. I wanted tolerances that were at the tighter end of the SAAMI.223 Rem specification, a semi fitted neck without the need for neck-turning and a short neck so we could still have 32gr VMax in the case while still touching the lands. I also wanted a short throat for anyone who wanted to chamber the AR-15 with 20 Practical. The 20 Practical loaded round will fit into the magazine without any problem and easily touch the AR-15 lands. The 20 Practical case feeds through an AR-15 flawlessly, thanks to its standard 23-degree shoulder. On my rifles, I only use Liljas barrels. I’ve had great success with them. They have always performed well and have been the easiest barrels to clean of all that I have used. I had sent my Tikka barreled actions to Dan Lilja before so that he would program a custom profile into his equipment, and then turn out a barrel which would perfectly fit the M595 Sporter stock. The M595 stock is very thin, so the contour needed to be perfect. Dan Lilja has made this custom contour available for anyone who wants to rebarrel a M595 Sporter with one his barrels. There are many options for.204-caliber varmint bullets
How to Make 20 Practical Cases – Simple and Easy
It is easy to form 20 practical cases. No fire-forming required. Start with any.223 Rem brass. Simply run the case through your bushing die and select the appropriate bushing. Project Componentry
My 20 Practical rifle began as a Tikka Model Stainless Sporter.223 Remington. If you look around, you can still find M595 Sporters at bargain prices. Mine cost less than $500. I think that the action is worth it! The receiver is milled with a dovetail to hold scope rings and has a side release bolt like expensive BR actions. The bolt is very smooth. The ammunition is fed by reliable 3- or 5-round single-column detachable magazines. (FYI: Tikka M595 22250 mags feed 6BR cases flawlessly. We kept the original Tikka trigger, but we fitted it with a lighter spring. The trigger pull is now a crisp 1.8 lbs-about the best you can get in a factory rifle. We replaced the factory tube by a custom Lilja 12-twist barrel with three grooves, 24”. Dan Lilja designed a custom M595 sporter contour that fits perfectly with the factory stock. I have fitted a Leupold 4-14x40mm Zoom in low Talley lightweight aluminum mounts. My 20 Practical, including optics, sling and other accessories, weighs just over 8.5 pounds. Test Report – How Does It Shoot?
Kevin returned the barreled action and barreled barrel in a very quick time. Kevin did an excellent job on the rifle. I asked him to match the Tikka’s bead-blasted finish when he finished the barrel. It was perfect. The only way to tell that it’s a custom is by the two extra inches of length, and the “20 Practical cartridge designation”. You’re probably wondering “how accurate is she?” Is this “prototype”, the first-ever 20 Practical rig, accurate? Yes, in a word. It can shoot 3/8″ groups with the factory stock and a light contour barrel. Look at the typical target for this rifle. This is an 8.5-pound sporting rifle with a very thin fore-end, and a factory-made trigger. Kevin Weaver’s Gunsmith’s Report
The 20 Practical: Development and Origins Editor’s NOTE We can’t say who was the first to neck down the.223 Rem cartridge to.20 and chamber a rifle in that wildcat (as compared to the.20 Tactical). Here is a story from 2006, when Warren B came up with the concept of a.20 Practical round, complete with reamer specifications. A year ago, I received a phone call from Warren. He had a great idea. Warren asked, “Why couldn’t the.223 Remington casing be necked down to 20 caliber so that we could get the same performance as 20 Tactical?” You can avoid the expensive forming tools that are required for the 20 Tactical. The idea was a good one, and I could see no major technical issues. So we started the project. I ordered a reamer with a.233″ neck from Dave Kiff, Pacific Tool & Gauge. The.233″ neck should allow a simple necking down of the 223 Remington to produce the 20 Practical case in one step. No need to fire-form! Dave’s PTG 20 Practical reamer should also work with any.223 Rem commercial or military brass. A few months later, the first 20 Practical round (via Warren’s Tikka), was fired down range. The brass formed easily as expected. With just one step, I was able to make a.20-caliber case. Warren is brilliant. [Editor’s note: We agree. Read the technical sections below for more information on Warren’s case forming methods and his tips to adapt.223 Rem Dies. It would take me almost six months to build a dedicated test gun chambered for 20 Practical. I used a Remington action, Remington synthetic semivarmint stock and a Douglas stainless steel XX 12twist barrel. I formed and filled about 30 cases with Remington brass within about 20 minutes. I used a.223 Rem seater die to seat 20 Practical bullets. The.223 seating die seated the 20-Cal bullets perfectly. The 40gr Hornady Vmax bullets were sent down range by the first loads at a modest speed of 3500 FPS. I did not shoot groups. I wanted to use the load to sight the rifle in and break in the barrel. The development of the load was easy- I started with reduced.223 Rem loads and 40gr bullets, and then worked my way up. Below is a table with some of my favorite loads and Warren’s favorite recipes. Bullet Wt. Bullet Weight Velocity FPS Comments. 32GR H4198 24.1, 4025 Warren’s lighter Gopher load. 32GR AA2460 28.8, 4154 Warren’s Coyote/Prairie Dog load. 32GR N133 26.1, 4183 Clean burn Coyote/PD Load. 33GR H4198 26.1, 4322 Hot load. Use with Caution. Use with Caution! These are my most accurate loads so far. I haven’t bothered with 40s because I have the 20 BR and 20 PPC for heavier bullets. I chose the lighter bullets for the 20 Practical because it was important to me that the rifle I use, a sporter-weighted predator rifle, would have a low recoil and maintain speed. The 32gr V-Max bullet is also extremely accurate and explosive. I prefer N133 because it burns so well. IMI cases are made of high-quality materials. Kevin’s Load notes: I used Remington cases, Hornady bullets and Remington 61/2 primers to develop these loads. CAUTION: All loads, including Warren’s and my own, should be reduced by 20% before starting load development for your rifle. All load data should only be used with caution. Start with low loads and ensure that they are safe for your guns before moving on to the high test load data. Weaver Rifles does not have any control over the components, guns or actual loads you choose. Comparing the 20 Tactical and 20 Practical
Kevin tells us that the 20 Practical and 20 Tactical cartridges are almost identical. Case Outside Diameter, case body length, and shoulder angle are the only differences. The 20 Tactical has a longer neck, but the 20 Practical still has enough neck to grip popular bullets such as the 32gr V-Max. Here are some specs. Cartridge Bolt Face to Shoulder Shoulder O.D. Shoulder Angle Total Length 20 Tactical 1.5778″.3553 23deg 1.7760″ 20 Practical 1.5778″.360 30deg 1.760 ” Both the 20 Tactical cartridge and the 20 Practical cartridge are fine.20 calibers. The 20 Tactical had the most publicity in the beginning, so it was more popular. My favorite would be the 20 Practical. Warren’s 20 Practical delivers the SAME performance of the 20 Tactical, without the need to fire-form or buy expensive forming tools. The 20 Practical is a great way to save money and do less work. What’s not like? What’s not to like?
It is easy to form 20 Practical cases. No fire-forming is necessary. Start with any good.223 Rem Brass. I like IMI cases. You can run the case through your bushing die and call it a day. I like to make the process a bit more complicated by doing it in steps. I find that doing it in steps is less stressful on the brass than one big step. If you resize the throat in a large step, it may not be what you expect, depending on how thick the neck is. This is particularly important when you are getting close to the final neck diameter. I ran my IMI cases through an old RCBS.223 Rem.223 Rem die without the decapping assembly. This will remove any dented necks from the raw cases, and reduce the necks to about 0.243″. Starting with a.223 FL FL die reduces the diameter of the neck quite a lot. This eliminates the need to purchase an extra bushing in the first step. I then use my Redding Type S die with two bushings sizes to get to where I need. I begin with the FL sizer and then move on to a Type S with a 0.233″ bushing, before finishing with a 0.228″ bushing. As I progress to the final reduction, you will notice that I am using smaller and smaller increments. Note: Your final bushing size will vary depending on the brass you use. I also form my other.20 calibres in incremental steps. The 20 PPC is the easiest to form as the 220 Russian parent case is very close to a.20 when it comes in its raw state. The 6mm BR has the most steps to convert to 20 BR because it comes in the raw form with the largest neck. This is the way I formed all four of my “practical.20” calibers: the 20-222 (20 Practical), the 20 PPC (20 BR), and the 20 BR (20 PPC). You can easily reduce or eliminate the number of steps on some parent cases. However, you should be aware of how much brass is being moved at the neck of the case in a single pass. Other Practical.20 Caliber cartridges Since the.20 was legitimized with bullets, cleaning rods, and barrels by some of the top suppliers, it became apparent to many varmint-shooters that it would be the perfect combination between velocity, BC and recoil for our sport. After many years of varmint hunting, I had a large collection of dies that were used for the different cartridges that we use to blast dirty little critters. I had already shot many old favorites, such as the Fireball, Deuce,.223 Rem and 22 PPC, before the.20 caliber became popular in the shooting world. When I decided to build my first.20-caliber rifle, I considered all the options available at the time. I decided to go with a practical solution and build a 20 PPC rifle using a 22 PPC die set and a rifle I already owned. This project had a low start-up cost because I already owned everything, including the reloading equipment. All I needed were a barrel and some odd parts to convert my Redding Dies to work with the PPC 20 (see sidebar). Since then, I’ve been hooked on.20 calibers. I have so far done four “practical”,.20 caliber cartridge/rifle combinations: the 20-222 (as well as the 20 Practical), the 20 PPC (as well as the 20 BR), and the 20 BR (as well as the 20 PPC). I had already reloaded their parent cases and had a Redding die set for all four. (body die, Type S neck bushing, comp seater). All four of these.20-calibers are excellent and have a special place in my varmint gun battery. I’d also like to do the 20-221, but I haven’t had time to do it yet. As a sign of how much I love the.20 for live varmint hunting, I’ve sold or rebarreled nearly every.22 and 6-mm rifle/cartridge combo that I owned. I sold my 6mm BR Panda barrel on the forums at 6mmBR.com, and have never looked behind. After you have shot a prairie-dog at 500 yards using a 20 BR and an 11-pound rifle, and witnessed the shot, you will never want to shoot with the heavier 6mm BR again. I’ll always remember my first trip to Montana with my 20 BR. After shooting a few Prairie Dogs way out there, I was able to see my hits clearly and turned to our guide John Wickens. I said “John, bring your rifle out to enjoy some shooting as I no longer need a spotter”. Yes,.20 calibers changed the way I hunt critters. All you professional varmint spotting professionals out there, your jobs are in danger! Join in the fun by packing a rifle. Make sure it’s a.20 calibre. Converting Redding Type-S Bushing Dies for.22 and.6mm Cartridges to.20 Caliber You can easily convert your Redding Type S bushing dies for a “parent cartridge” of.22 or.6mm cartridges for use with the.20 caliber versions of those cartridges. I have done this so far with four.20-caliber cartridges: 20-222 (practical), 20 PPC (20mm), and 20 BR (20mm). All of them shoot beautifully. The 20-221 or even the 20-250 are also options. You can get the parts you need to convert your existing Redding 6mm Type-S or.22 caliber bushing dies to.20 caliber from your favorite reloading supply or Redding. You will need to replace a bushing or two. Redding and Wilson both offer a variety of bushing sizes to fit.20 caliber cartridges. You will also require either a 17 Remington Type S or 17 Mach IV decapping assembly. The 17 Mach IV assembly is used for the shorter 20-221, as well as 20 PPC and BR. The 17 Rem assembly can be used with the longer 20-221, 20 Practical or 20-250. These two decapping assembly allow the use of Redding’s button sizing.204-diameter. If you do not plan to use a die button, you can still use the stock decapping assemblies by turning or filing the existing button. You can also use the decapping pin retainer from one of Redding’s carbide button kit that has been filed or turned down. I use a button when I don’t neck turn a cartridge. This will ensure consistent neck tension for un-turned factory necks. I wish Redding would sell.20-caliber carbide buttons to us.20-caliber shooters. I use carbide button in all my larger dies, and they work great. The photo shows A) two different lengths of.22 seater inserts for the Redding Competition Seater, B) a short 17 Mach III Type-S decapping unit used in the 20-221, the 20 PPC and the 20 BR, C) a.20 caliber button and D) two Hornady V-Maxs.20 caliber. Parts List: Redding Part# 10715, bushing neck die decapping rod stem (short); Redding Part# 42203,.20-caliber size button; Redding Part# 55042, BR Seat Plug for.22 cal. (long). For the seater I use Redding Competition seating dies. You can use any seater. Redding’s Competition Seaters have consistently produced good results. These seaters gave me the same consistent results even though they were designed for larger parent calibers. The.204 calibers are seated perfectly by the.224 seater inserts, both in terms of the bullet’s straightness and the final loaded round. Only one of the four.20 calibers that I have built with the “practical method” required a change in the seater die. This was my 20 PPC. Depending on how your rifle has been throated, the seater plug may or may not be needed. My 20 PPC was throated short, so my 22 PPC Competition Seater couldn’t get the bullet into the case far enough. Redding makes.22 seater connectors for the Competition Seaters. They come in two different lengths. The PPC and BR Competion Seaters are supplied with the short length plug. I had to order a longer seater plug because my 20 PPC was too short. The longer plug allows the bullet to be inserted into the case far enough with plenty of adjustment room.