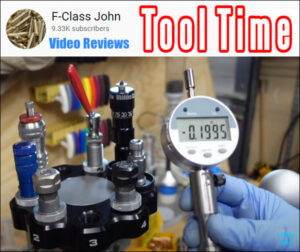
The Tactical Rifle Shooters Facebook Group has recently shown tools that are used to measure the headspace of a case before and after “bumping”. Hand-loaders who use full-length sizing will bump the shoulders after firing a case anywhere between.001″ and.0035″, depending on the rifle. We like a bump of.0015″ for our 6mmBR cases and Dasher cases. You want to have the same amount of bump and case sizing for all your brass. It is important to measure your brass before and after FL sizing. We check each case when we have the time. Some people will only check the first 3-4 instances coming out of the FL die to ensure that the FL die setting and desired headspace/bump are delivered. 1. Whidden Shoulder Bump gauge There are many tools that can be utilized to measure shoulder bump. Whidden Gunworks makes a special bushing that is designed for cartridges. This is our favorite. The Whidden ShoulderBump Gauge allows you to adjust your sizing tool to the desired measurement. The bump gauge is attached with a set-screw to your calipers and measures the distance from the base of the case to the shoulder. The photo below is from Tactical Rifle Shooters and shows the Whidden Bump Gauge used for the.375 CheyTac Cartridge. 2. Dave Manson Vertical Comparer with Dial Readout Background image courtesy of Tactical Rifle Shooters. Inset photo courtesy of Manson Precision Reamers. Dave Manson says: “This tool is designed to make the life of advanced shooters and reloaders easier by allowing precise measurements of ammunition, chamber, and case headspace. This information will allow the reloader to fine-tune the clearances and fits of his ammunition with the chamber, resulting in improvements in accuracy and case longevity. Measure headspace in factory or reloaded ammo
2. Measure the headspace in a fired cartridge to determine the chamber headspace
3. When setting up reloading dies, ensure that the shoulder set-back is minimal.
4. Compare base-to ogive length in order to ensure bullet-to rifling consistency. In addition to the Dial Indicator and Stand, the $150.00 Vertical Comparator is supplied with multiple Datum Blocks of precise length and inside diameter (.3300”/.3750”/.4000”/.4375”). MORE INFO HERE — Catalog page 29. 3. Hornady Lock-N Load Headspace Comparer System The Lock-N Load Headspace Comparer system from Hornady is simple to use and convenient. Midsouth offers a kit that includes a Red bushing-holder and 5 bushings. The kit costs $39.99. Hornady says: “The Lock-N-Load (r) Headspace Comparer… gauge measures variations before and after firing or recalibration.” It allows headspace comparisons between fire-formed and resized brass. Hornady has five bushing sizes:.330″,.350″,.375″,.400″ and.420″. One tip — we have found that Hornady gauges can vary from unit to unit, even if they are the same nominal size. Test each gauge on your brass if you have several for the same cartridge. You may notice a slight difference. Mark one and use it consistently. Anvil Base Kits are also available that mount to the opposite blade of the caliper. This provides a more solid surface for your case’s base. 4. L.E. Wilson Case Gage Depth Micrometer (currently $130.00) If you want to take precise “bump measurements” without having to use calipers or clamp-on gauge block, you might consider the L.E. Wilson Case Gage Depth Micrometer ($130.00 at the moment). This allows for repeatable, precise measurements. However, you must know your starting point. The manufacturer explains that “every reloader must know how much their Full Length Sizing Die pushes back the shoulder. You can now do this with the NEW Case Gage Depth Micrometer! It’s never been easier to take measurements of your case headspace before and following sizing. The Depth Mic lets you slip the micrometer over the top of Gage while your case is inserted in the Gage to take a measure. The Micrometer has graduations in.001′. Our factory has set the Case Gage Depth Micrometer to a zero of 0.100”. We include a Gage Block so you can test Zero and adjust it if needed. If you don’t have the comparator tools, this “field-friendly” setup is for you. You can measure shoulder bump using a.45 ACP (or another suitable pistol case). The mouth of the.45 ACP case should sit on the shoulder of the rifle cartridge brass. Make sure that the.45 ACP cartridge case is square and round. We recommend that you run it through a expander first, then size, trim and chamfer it. Then, slip the.45 ACP over the neck of an unsized, fired rifle case. Remove the primer. Align the cases between your calipers jaws and note the length of the two cases from rim-to-rim (See photo on the left below). Now you have the length of a rifle case that has been fired BEFORE sizing. Next, take the full-length rifle case without primer and do the same, placing the.45 ACP over the neck of FL-sized case. (Right photo). The difference between these two numbers is how much “bump” you are applying to your shoulder. Here, the difference is.0015″. The amount of bump that you need depends on your chamber and load, but.0015 to.002” would be a good starting point.