


September 20th, 2020Close-up of a sectioned box. Glen Zediker observed that this one was “fixin’ pop”. Here are some highlights from an article Glen Zediker authored for the Midsouth Blog. Glen Zediker, who tragically passed away in 2020 focused on cartridge brass in that article. Glen identified the most common failures with brass that’s been shot multiple times or that’s been fired under excessive pressure. Glen explained how to check your cartridges to detect “early signs” of failure, especially case head separation. Glen has written many excellent books about reloading. This article is adapted directly from two of Glen Zediker’s books, Handloading for Competition and Top Grade Ammo. How Cases Degrade With Multiple Firings by Glen Zediker
This article explains how to monitor the progress of the changes that begin with the firing of a new case. In a sense, it’s “the progress of degeneration” because the concern is determining when enough changes have occurred in the brass to warrant attention. Or abandonment. For me, that’s four firings. As I said the last time, this is when I may see changes that require attention. As I said before, this figure was not a random number, but based on my own notes when running my NRA High Power Rifle competition loads. [Editor’s note: When using Lapua brass in bolt-action guns, we get around 10 good (match worthy) firings. If you anneal the Lapua Brass and use modest pressures then Lapua Brass can perform well over 20 or more load cycle. The areas most affected by this are the case head and neck. The case head body walls become thinner, but the neck wall gets thicker. Primer pockets become deeper and larger. This case shows both a cracked neck and a crack (separation), above the case head. Zediker states that it is “rare” to find a case with both the most common failures. [This case] had been attacked by an M14. “Case head — Causes of Separation & Cracking
When a case is put under pressure, the brass will flow where it can. It will move to where it is more free. The chamber steel limits its expansion. The case base is slammed against the bolt face as the case shoulder blows forward. It is stretched by the tugging on both ends. The shoulder area can expand to conform to chambers, but not the case head. The thickest walls are in the shoulder area, so it does not expand much. It stretches. The “case head region,” as I call it here, is that portion of the case just above the web. This is above the taper leading into the extractor groove. The “area” is approximately an eighth inch up the case body. Here’s a “pressure band.” If you look closely, you’ll see the “area” after firing. If you see this, the case is closed. The bright ring indicates that the case has been stretched too far, which is a sign of excessive thinning. If you notice a ring around the case that is lighter than the case body and is in this area, then I would say the case has been finished. This is where the “head separation” happens. It can split and also blow slap into two, and this is the “separation”.
Photo courtesy of GS Arizona.This area is one to watch closely as cases age. This is the area that has been “protected” more by sizing, with a smaller case shoulder set-back. This is where the gap created by the case shoulder allows for stretching in this area. If you see a sign of a possible head separation, it’s likely that the shoulder set-back and load pressure levels are excessive.
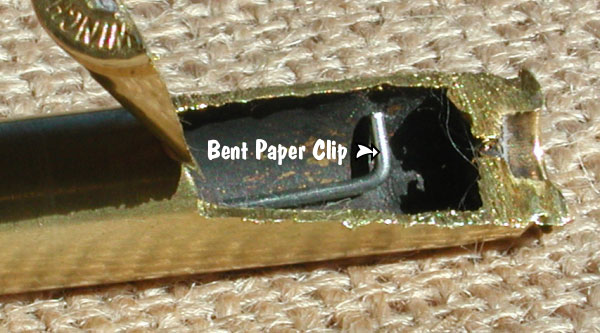
Editor: A bent paper clip can be used to detect possible case wall problems. Slide the paperclip inside your case to look for thin spots. GS Arizona explains that this simple tool (bent-paper clip) allows you to check the inside of your cases before reloading them. As you run the clip along the inside of the cases, the thin spot will become apparent. If you see a shiny line outside, and the clip is hitting a thin area inside, it’s best to retire the case.” Photo by GS Arizona. Monitor Primer Pocket Dimensional changes
The primer pocket is another area to check for pressure and case head. The primer pocket will grow in size and depth with each firing. The question is “when” and then “how much”, and the most important thing is “how much?” “If the pocket becomes excessively shallow and is judged by the primer not being at least a tick under flush with the case, there could function issues. With a semi-auto using a floating firing-pin, there’s the risk of a slam-fire. If there is any protrusion in the case, it has the same effect as not enough headspace. A primer pocket uniformer will reset the depth of the shallowed primer pockets to what they should be. But for me, the real test is how easily the primers seat into the pocket. If there is a significant reduction in resistance, then I will consider the case to be finished. The shallower can be refurbished. This is the primary function of a pocket primer uniformer. A larger diameter can’t be corrected. I’ve said in a few articles that my main gauge for load pressure is how much primer pockets have expanded.
Similar Posts:Tags: Cartridge Brass, Case Inspection, Case Separation, Case-Head, Glen Zediker, GS Arizona, Paper Clip Gauge, Rifle Brass