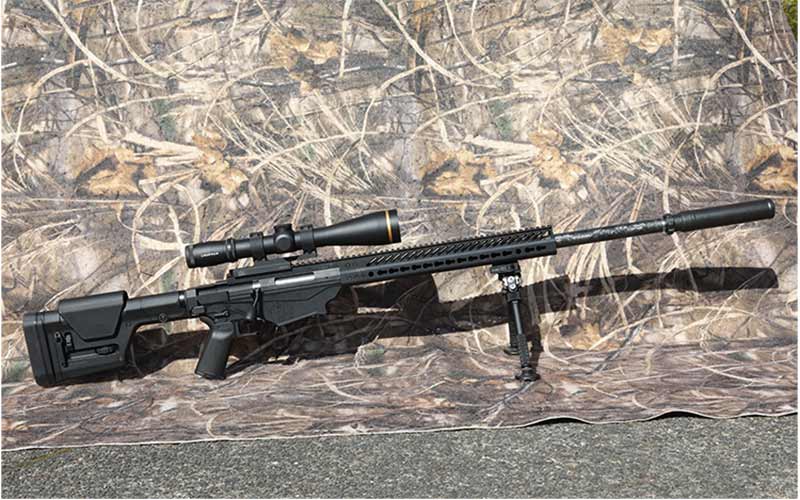


The makeover of the Enhanced Ruger Precision rifle. The company used Mike Fifer’s quote, “Sixteen thousand yards” in its marketing campaign. That’s enough. “The final product – an upgraded Enhanced Ruger Precision Rifle. Shooters soon discovered that the tagline was much more than just marketing hype. Instantly, social media was flooded with videos showing RPRs being shot at over 1,000 yards and even a mile. Many writers, including this one, couldn’t get hold of the rifles without waiting several months. The RPR chassis rifle was a bolt-action rifle with many black components. People began to customize the RPR quickly – most often swapping out the handguard and adding a metal bolt shroud and putting on a muzzle brake. Nearly 16,000 people have signed up for the Ruger Precision Rifle Facebook group. Ruger started offering the Enhanced RPR in 2016. This was after the company noticed some of the modifications being made to the RPR. The refinements included a new billet aluminum bolt shroud and a handguard. Ruger also increased the price by $200 to $1,599 MSRP. These were welcome upgrades. However, there were still areas for improvement. This article will discuss some of the most common upgrades to the enhanced RPR. You should ensure that your rifle is unloaded before you begin any modifications. This includes the removal of the magazine and visual inspection of the empty chamber.
The stock is perhaps the most obvious thing about the RPR. It is space-gun-like and adjustable for length, cant, cheek weld, and length of pull. While some shooters love the stock, others struggle to get it off their guns fast enough. It is a folding stock that can be replaced with almost any type of aftermarket stock for black rifles. After customization, the folding component of the rifle remains intact. The Magpul Precision Rifle Stock, (PRS) Gen 3 was chosen for this project. Since its inception, the PRS has been a standard stock for precision black rifle build. It can be field adjusted for length of pull (1.4inches) and cheek weld height (0.8inches) without the need of tools. It can also be adjusted for the butt stock pad height or cant. The Gen 3 PRS works with both small and large-frame black rifles. The latest PRS also features limited rotation QD sockets that allow for sling attachments fore and aft of the stock. This is part of a removable, reversible sling loop. Magpul also included MLOK slots at the bottom of the stock for attaching an accessory. The Gen 3 PRS weighs in at just 27.8 ounces, which is almost 10% less than the Gen 2 PRS. However, the new Magpul Precision Rifle Stock 3.0 is lighter and still allows for full adjustability. The Magpul MOE+ features a grippy texture, and a storage compartment. It is just as easy to swap out the stock as any other black rifle. To release the pressure from the clamp that holds your stock to the buffer tube, loosen the nut at the action of the original stock. Next, slide the PRS onto the buffer tube. This modification took less than 5 minutes.
Although the stock trigger in the Enhanced RPR works well, it is not suitable for all shooters. While most people can use the stock trigger with great results, some shooters find the center blade safety feature annoying. The Timney drop-in trigger is an excellent option for those who wish to upgrade their RPR trigger. Although it is simple, it can be nerve-racking to do this the first time. There are three hex head bolts that must be removed, one at the rear and two on the side. The folding stock conceals the latter. Ruger made the bolts identical so that you don’t have to keep track of which one is which. This step requires a 3/16 hex wrench. This is a good time for you to remove the bolt. The trigger assembly is held together by a single hex bolt. This also has a 3/16-hex head. To the top of the J, a detent with a J-shaped slot in the side of the assembly must be moved. Next, pull the silver tabs out of the action. Finally, use a nylon mallet to tap the trigger assembly on its muzzle side. The whole thing will pop out. The Timney trigger is installed in the reverse order. Slide the Timney assembly into place and attach the retaining screw. Adjustment of the pull weight can be made to the two-stage Timney trigger, but only after installation. Adjust the take-up stage as needed. You can manually turn the trigger by pressing on the bar at the side of the assembly. This will open the recess where the safety selector will be inserted. This modification took 15 minutes.
The Enhanced RPR handguard is a great upgrade to the original. It is lighter than the original RPR handguard and doesn’t have a full-length rail. The new version addresses many of the user’s concerns. There are many other options. The Seekins Precision SP3R Rail System Ruger Compatible was chosen for this project. Seekins products are masterpieces that combine form and function in a way that delights shooters. I am familiar with the features of the SP3R Rail System having used it on my 3-gun rifle for many years. The SP3R features a unique mounting nut and precise rail-to-nut fit which creates a rigid, free floating rail. It is easier to shoot through many barriers that are used in action shooting competitions because the rail has a flat bottom. The Keymod and MLOK slots are available. The Keymod version was chosen for this build. The original rail is then removed and the mounting screws are removed. Next, the mounting nut must be removed. The Seekins mounting was then threaded all of the way on, and then backed off to index the rail. The jam nut was tightened by hand and then the SP3R rail was indexed. This was done by attaching a one-piece scope mount to both the SP3R and upper. Finally, the rail was removed and tightened completely. The SP3R handguard attaches with 12 screws to the mounting nuts. This procedure took about 10 minutes.
Ruger’s barrels in the RPR yield very good results. It is difficult to remove them because they are “on here”, but an AR armor’s wrench, and a good barrel vise, will make it easy. If you want to learn how to do this yourself, there are many YouTube videos. A good barrel vise is the key. You may want to have this done professionally by a gunsmith. This is the route that this writer chose. I didn’t have head space gauges at the time and a carbon-fiber-wrapped match-grade barrel from PROOF Research was chosen for this project. These barrels are half the weight of stainless barrels with similar contours and dissipate heat more effectively. PROOF barrels are more stable and can hold tight groups even after stringing long shots. These barrels are beautiful and provide excellent accuracy. While I believe rifles should be used as tools, I have to admit that I am a fan of the PROOF barrel. Other Items
The stock grip is not exceptional, so I chose the Magpul MOE PLUS grip. This grip is one I have used on many other rifles so it was easy to get used to. The RPR stock safety is a standard rifle safety that is retained by a simple spring. An ambidextrous safety by Seekins Precision was installed during the trigger swap. This simple modification allows the shooter to operate the rifle with greater freedom. The stock muzzle device was also modified to allow for AAC Brakeout 2.0, which allows an AAC SR-7 suppressor attachment as needed. This upgrade has one problem. The stock muzzle brake has an obscure jam nut. It allows the brakes to be set to the correct position. The AAC Brakeout2.0 does not require indexing.
Although the rifle shoots much better than me, sub-MOA is easy for me. Factory ammunition has allowed me to get the rifle to 1100 yards. The best Hornady ELD Match 140-grain ammunition has been produced. The Hornady ELD Match 140 grain ammunition has the best results. Target grids and bullseye sizes can be downloaded in MOA. Perfect for long-range shooting! Get free targets