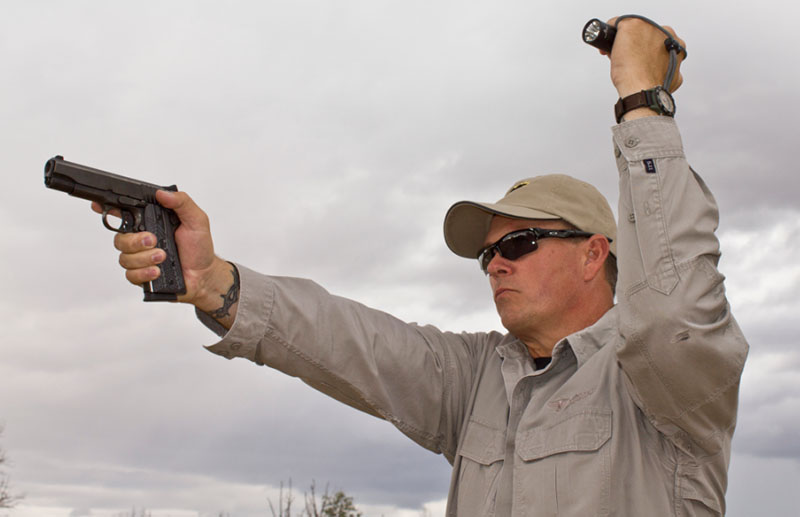


Not so long ago, a flashlight was a simple flashlight. You bought one at the Dollar Store and put some D-cells inside. Around 25 years ago, the old Maglite was one of the best flashlights available. It was a long, heavy aluminum flashlight that cops preferred because it was bright but not too bright. You can begin by using the rule of four Ls when selecting a flashlight to use with your handgun. It should have a minimum 100 lumens and be powered by lithium battery. It should also have an LED bulb, and be compatible or come with a lanyard. The light should have tailpiece activation. There are several different techniques, each with their own pros and cons. The best way to decide which technique is best for you is to become proficient in all of them and use the one that fits the situation. With the FBI technique, hold the light away with your non-shooting arm. It’s an effective technique for searching but not for shooting. The FBI developed this technique because they thought that bad guys would shoot at the light because they believed that was where you were. The flashlight is held away from the body, out to the side and upwards in your non-shooting arm as you search and engage targets. It’s a good way to search, but when you start shooting it becomes less important. Shooting with one hand won’t get you the best results. The neck index method is a good progression technique that lets you go from looking to shooting. Imagine you are using the FBI technique for searching and you spot a threat. When you begin to present your weapon, you can use the index method by pulling the light up to your neck. This is similar to placing your support hand in the middle of your body when presenting a weapon normally. You simply pull your flashlight up to your chin, with the bright end facing the threat. The neck index method is not a good way to place the flashlight when presenting your handgun. It does not offer any support for your shooting hand. After presenting your handgun, you should switch to a technique which offers some support for your gunhand. This technique is taught most often at law enforcement academies and is endorsed by Gunsite. Why? The Harries technique is used to lock your hands together. It works with flashlights with the activation button at the end of the flashlight or on the flashlight’s body. To use, slide your flashlight hand underneath your shooting arm. Then lower the elbow on your flashlight arm. This puts pressure on the back of your gun and creates a stable shooting platform. The Harries technique is now the standard method for shooting handheld lights. It’s not the best method for searching. This is because your handgun will follow your light. It’s the fastest and safest method of all the flashlight techniques. But it is also the most difficult. You will need a small, bright flashlight with a button at the tailpiece. It would be ideal if the rubber grommet was positioned a few inches in front. SureFire used make lights specifically for this purpose but they have all been discontinued. Hold the flashlight between your index and middle finger and use your bottom fingers to grip the gun. The trick is to learn how to orient the flashlight with the handgun. Shooters usually point their light towards the ground. This isn’t a bad thing. The SureFire technique is only available with a specially-equipped flashlight. Unfortunately, SureFire does not offer one. It is very quick to assume, and it provides shooting hand support. The Harries and SureFire flashlight self-defense techniques offer the most stable platforms for shooting, but they also have a major disadvantage: If you are searching your home, yard, or anywhere else, you will be pointing your handgun in that direction. If you choose a light that has a wide flood, you can use these techniques to search while holding your handgun low and looking at the edge of the beam. Let the light bounce up from the floor. It’s still not a good idea to pull out your handgun if you aren’t sure what you’re facing. A safer approach is to keep your handgun in your holster or close to your body, muzzle pointing in a safe way. You can use the neck index, the SureFire, or Harries techniques, or you can just switch to either. A handheld light is the best option, but we’ll discuss that in a future article. Finally, a lanyard is a great idea for your self-defense light. It will keep the flashlight close to hand in case you drop it, or need to release it to open doors, dial 911, or perform a reload. I used a tactical flashlight to check alleys and suspicious characters while on my honeymoon in New Orleans’ French Quarter. I also carried a Colt Lightweight Commander. The flashlight was used a lot, but I never had to use the Colt. Editor’s Note: this article originally appeared in the Gun Digest the Magazine November 2022 issue. More on Tactical Lighting:NEXT: Download Your Free Storm Tactical Printing Target Pack62 Printable MOA targets with DOT drills – Rifle range in YARDSThis impressive pack from our friends at Storm Tactical includes62 printable targets for rifle and handgun ranges. The target grids and the bullseye sizes have been converted to MOA. Subscribe to the Gun Digest newsletter and we will send you your print-at home target pack immediately. Enter your email below.


BargainFinder 500: AccurateShooter’s Talks of the Week
As an Amazon Associate, this site earns a commission from Amazon sales. April 20th, 2025 BargainFinder 500: AccurateShooter’s Deals of the Week This week