


You have the right gun. The futuristic, lightweight material used to make your cutting-edge holster was chosen. Your belt is made with lightweight, futuristic material to carry your defensive rig comfortably and securely. You then took your shiny new handgun to range and created a few social-media-worthy groups. You are now ready to carry defensively. Quick question: How much time did it take to draw a fast gun? This is where people often become quiet. It is crucial to be able quickly and smoothly get your gun into combat.
You will need to quickly get your weapon out of the holster in case of an emergency. This skill is often overlooked because it’s not very sexy. Let’s take a closer look at this. Let’s take a look at a solid draw. This will give you the tools to draw, and fight back when necessary.
“It looks like your are ready to go for defensive carrying. Quick question: How much time did it take to practice your gun draw? This is where people often become quiet.
Fred Mastison’s Tips to Draw a Fast Gun
Tip #1: Clean the Gun Smoothly
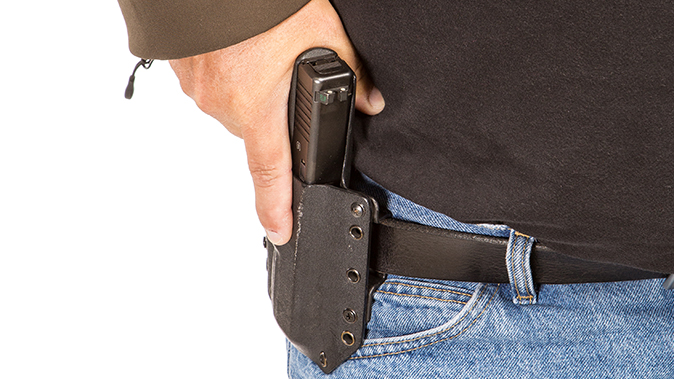
You carry a concealed weapon almost every day. We need to talk about a way to get your gun out of your outer clothes. There are two types of on-body carry methods. We’ll concentrate on the first.
Have you ever heard the expression “Slow is smooth, but smooth is fast?” This means taking the time to do everything correctly, such as your draw stroke. Then, speed up the process to prepare for a dangerous encounter in the real world.
RELATED STORY
Your Guide to Situational Awareness, Threat Assessment and Response
You will need to remove any jackets or loose shirts that you are wearing with your shooting hand. To prepare, place your support-side hand on the abdomen. Next, bend your fingers in towards your palm and sweep the garment back with a fluid motion. To ensure that the garment doesn’t rebound or interfere with the draw, do this with gusto.
If you are wearing a shirt underneath, you can use your support-sidehand to pull the shirt up and expose it. Do not attempt to make it easier by lifting the shirt a little. You should raise the shirt so that you have enough room to grip it well.
Tip #2: Use a strong grip
Next, we need to get a firm grip on the gun. Your initial grip should be strong enough that you can hold the gun when it fires. Many people draw their gun, then adjust their grip before they shoot. This can be dangerous and takes too much time.
For a solid shooting grip, place your strong hand on the pistol, with your thumb pressed against the side. Keep your thumb pointing up so that the web of the hand touches the grip. Next, close your hand and pull the weapon straight up. You should now have a solid grip on the gun.
Tip #3: Drop Your Elbow
Once you have a firm grip and the gun is out of its holster it is time for it to be pointed at the threat. Simply drop your elbow to your side to raise the muzzle towards the target. This will quickly raise the muzzle and point the gun in the direction of the threat. At this point, we press the trigger.
This “close-contact” position can be more than just a step in a draw stroke. It could also be a shooting position. Your forearm should remain in contact with your side while the weapon is pointed towards the threat. Although it is not the most precise position, it is a good position to shoot from in case you don’t have time to extend your arms fully. We want to minimize unnecessary motion. Your support and your shooting hands are the only things that move. Do not crouch or add any extra movements to the process. Draw simple and smoothly.
Tip #4: Secure Your Grip
For additional stability, if you have the time, place your support hand on the grip. As the handgun moves forward, your support hand should remain on your abdomen. As you press the gun forward, your support hand should melt onto it. Your strong hand should be firmly seated on top of the gun, with your support hand riding along the slide.
You need a grip that allows for dynamic tension. The strong hand pushes forward while the support hand pulls back. This allows you stabilize the gun and makes it easier to make better shots. It is important to not let your support hand drift in space while you draw. Many people have had to ventilate their hands or cut their fingers because their support hand was too close to the trigger. This stage is where you should start to remove the extra travel from the trigger and get ready to take your shots.
Tip #5 – Push the Gun Forward
Once your hands are securely welded to the gun press forward to achieve the best shooting position. We have good dynamic tension, and the trigger is not slack. We are 100% ready to fire a great shot now.
The final step in this formula is to get the gun into a fighting posture. Your support hand can do much more than stabilize the grip. Your support hand can also be used to raise the gun to your eye. To raise the pistol, press your support hand upwards, under the trigger guard. This will reduce the time it takes to do this without losing your grip.
If you have the time and space, extend your arms outward after you draw your pistol. This will allow you to see clearly before you fire.
It is important to have a firm grip. We want to strike a balance between strength, but also subtlety. Because it can affect your accuracy, you must not crush the grip. I believe that 70% of grip is achieved by the support hand wrapping around your strong hand. The shooting hand is responsible for the remaining 30% of the grip. This allows the shooting arm to be relaxed enough to pull the trigger finger smoothly. You can’t squeeze too hard, which makes it difficult to move your trigger finger smoothly. This will negatively impact your accuracy.
Drawing tips for the final gun
The “point in” motion should be simple and the muzzle should always point at the target. Two major habits that can be developed by people are: The first is known as “bowling” and it is when a person doesn’t drop their elbow on the draw, but still continues to hold the gun. The muzzle follows a slow curve from low to high as “bowling” the gun into combat. Problematic is also when shooters raise their muzzle too high and create an “up-and-over” arc onto the target. This is what I call the “Charlie’s Angels draw” because it helps shooters avoid this type of movement. If the shooter continues to make these mistakes, I’ll give them one Angel’s name.
RELATED STORY
How to choose a gun for self-defense
We want to maintain a strong natural position behind our gun. We want to avoid extra motion whenever possible. The gun should be at eye level, not vice versa. If you raise the gun while lowering it, you will quickly become a “tactical turtle”, with your shoulders tight and your ears pressed against your ears. It is important to be able shoot from a relaxed, but firm, position.
Reholstering
Reholstering is nothing more than a rewind on the original presentation. Place your hand on your stomach and draw the gun back towards you. Now, pause and slowly angle the muzzle towards your holster. Once the gun is in place, slowly and reluctantly slide it back into the holster. In the event of an obstruction, we slow down and slide the gun back into the holster. If your shirt, spent casings or other items get into the trigger guard of your handgun, they can cause a negligent discharge. Reholstering is not something you should rush. You can’t win a gunfight by reholstering your sidearm quickly.
Any serious shooter should be able to draw the handgun. It can be made effortless with practice and repetition. It will become smoother and faster the more you practice it. Although it’s helpful to practice drawing in small steps, you should be able to draw quickly and efficiently. Range habits can be hard to break, and they can become ingrained. Many students learned the draw in a five- or four-step manner. They are technically sound but they often pause at every stage of the draw. This adds to the draw’s time, which is something we don’t have much of in a gunfight.
Gun drawing is not a fast process. Once you are proficient, speed will be a secondary part. The draw will become a natural and quick motion that allows you get your gun into combat. It is a skill we should learn in order to never have to use it. Continue Reading
Are you still having trouble finding what you were looking?
Search
Personal Defense World published the post Tips & Tricks for a Fast Gun Draw.